Sunday, 17 June 2012

Pin Cushion Swap {What I made}

I recently joined in with the fun Pin Cushion Swap over at Sew Far Sew Good and House of Pinheiro.  My partner was Rachel from At the Butterfly Ball.  Well, Rachel received her pin cushion from me this week, so I can now do my big Ta-dah and reveal what I made and sent her.

It is a little house pin cushion...

With a cute little birdie and windows...

...and a sweet little flowery vine (honeysuckle, I think)...those little stitches took ages...

With a little storage pouch on the back...with the opening on the bottom rather than the top.  Another boo boo on my part (am pretty good at boo boo's!).  The pouch will work just fine until Rachel tries to hang it up, then anything heavy will come a slip-sliding oooot.

Before you go thinking that I am just so smart and clever and talented (ja, like you were thinking that...I have to polish my own halo sometimes...), I used this tutorial as my basis, but stretched the height to something like 19cm, as I wanted some storage element to it...for scissors and marker pens and a little ruler maybe.

It was really hard for me to part with this little house.  I wanted to keep it all to myself and display it on a little hook or door knob somewhere.  I had so much fun choosing fabrics and deciding how it was all going to come together.  Will have to make at least one more...make that maybe a whole bunch more - one for each door knob in our house...

As a little something extra for Rachel - she has a whole handful of children - I also sent her one of my tea towels.  What with summer holidays here, I thought it might be nice as a quiet and not too messy activity for her kid-lettes to colour in and for her to get to use and enjoy her childrens art work.

Now...the suspense just kills me!  Rachel posted my pin cushion a few days ago.  It's going to take forever to get here.  Like, a whole week!


Saturday, 16 June 2012

To Shop Swap or not to Shop Swap?

What with all the swapping going on in blog land, I was thinking that a shop swap might be a nice idea.  The general idea being that if you have a shop - selling handmade or not handmade or supplies or whatever - then you can join in by agreeing to swap something from your shop with something from someone else's shop.  The sender does the choosing and the receiver gets a fun surprise.

I could try and sort partners out so that the recipient receives something appropriate - i.e.  they don't receive child related stuff if they have no children or sewing related stuff if they don't sew.  We could also put a suggested minimum (selling price) value on what is sent to try and even the playing field.

What do you think?  Would this interest you?


Fabric Stamping Update

This is just a quick follow up on Ava's butterfly t-shirt stamping effort.  The shirt has been washed...and stained some more at nursery...

The pictures aren't amazingly clear, but there was a little fading in the (40deg C) wash.  Not much, and certainly not enough to get upset about.  All in all, I am really pleased with the way the stamping worked.

Now, I need to have a little think about what I am going to stamp next.  Any ideas?  I would like something a little neater (read: no Ava help!) and something that I can wear or use.  I also have this idea stuck in my head that I want to give block carving a go - you know, the rubber block stuff by the likes of Speedball, not lino or wood.

Oi....like I need any other projects right now....


Thursday, 14 June 2012

A Homemade Gift for a New Baby


A friend recently had her 3rd baby.  A little boy.  He is a very lucky little man with 2 older sisters - at 8 and 5 years old, he is sure to be looked out for.

I couldn't bring myself to buy him a birthday gift.  Mostly because I like to 'make'.  But also because I know that no one else will have given the same thing if I give him something hand made.


So, I bought two 3-6mth sized white body suits and embellished them with spot creatures.  Coloured body suits would have been more fun, but I couldn't find any at the time.  It was really easy...all I did was cut out 2 circles of Bondaweb and fuse them to my coloured fabric.  Then I cut out the circles and fused them to the body suits.  I sewed the circles on with a straight stitch on my sewing machine.

For the black lines I used a Crayola fabric marker pen.  Stupidly, I drew the lines on with a blue water soluble pen first.  I have had issues with soluble pens where once ironed the pen doesn't wash off, so I tried to remove most of the blue before ironing the black pen.  Stupid, silly me...of course the black pen would bleed with the water.  So...if you are going to give this a try - I would use an air marker...one of those that vanish by themselves.  Know the ones I mean?  Like this one?  Also, it is helpful to slip a sheet of sandpaper under your fabric to stop it from slipping around while you draw.

I am really hoping that the worst of the bleed will wash out.  Sorry little guy, I hate to give a sub-standard gift.   Here are the, um, fox (?) and the bee.

I also made a special co-ordinating pair of my baby hot pants for the little chappie.  This is the bum view, with the label nicely located so it isn't scratchy on is lovely soft skin.

As he is just about 1 month old, he should have some wear of these during our summer.  That is, if the weather ever heats up!

For his big sisters, they each have a circle skirt - made from two of the lovely soft Pat Bravo fabrics that I have in my shop.

I loved making all the goodies...fingers crossed that they all fit and are enjoyed...

Monday, 11 June 2012

Oh Crumpets! {Recipe}

Oh rats!  Oh crumpets!  Oh bother!  Oh nuts!  It sucks....I am back at work.  As of last week actually.  Just one day last week, what with bank holidays and all.

It's good to be back.  Kind of.  The upside is not being bugged 53,142 times during the day about everything and anything...from the ladybird on the window to the snot that needs wiping.  Being able to go to the loo with out an audience is a novelty.  Going to the loo with out worrying that one munch-kin might maim a dog, or fling herself off the couch/bean bag is quite nice too.  I am quite enjoying my lunch for one too.

Beeeg downsides along the lines of separation anxiety - for me (!) and the kid-lettes, especially Chloe; the hour long journey each way; the glum train faces; the ridiculous cost of my train journey.  I mean, for my 20 minutes of standing pleasure I have to cough up £5.90 each way!  Just totally nuts.  90p more than it was a year ago.  Forking over the bulk of my salary to pay someone else to look after the little flowers is probably the absolute biggest downside.


Anyhooo...here is a crumpety recipe for you.  I like to make these at the weekend for breakfast.  Sometimes I halve the recipe, sometimes I make a full batch.  With the girls eating as much as they do at the minute, I made a full batch yesterday and every. single. last. one. was devoured.

These crumpets are what I would imagine American Pancakes are like - thick and fluffy.  Not the British crumpet, which I have only ever had bought from the shop...which were thick and rubbery and holey.

So, here is the recipe.....the full batch recipe....

Whisk together:
2 cups of flour
3 1/2 tsp baking powder
1 tsp salt
2 tbsp sugar
2 eggs
1 3/4 cup milk (approx 440ml)
1/4 cup melted margarine (approx 60ml)

I pour my whisked mixture into a big measuring jug so that I can then just pour the mixture into the frying pan.  Otherwise, a soup ladle works pretty darn well too.

The mixture has the consistency of a thick-ish cream.  For some reason my batter is sometimes runnier than other times.  If the crumpets are looking a bit thin, I add a little more flour.

Pour some batter on to your hot frying pan or griddle.  Wait for the bubbles and flip it over until both sides are golden brown.

Keep them warm wrapped up in a pretty tea towel.

Get creative with your shapes!

Our favourite toppings are syrup or marmite (YUM!).  What are your favourite crumpet toppings?


Friday, 8 June 2012

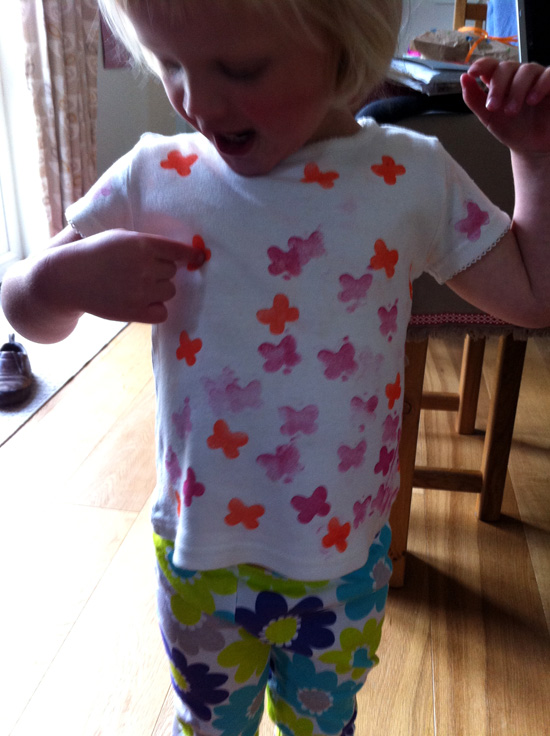
Stamping on Fabric {Butterfly T-Shirt)

I have been wanting to try stamping on fabric for a little while now.  I quite like to funky-up {read stuff up} Ava's nursery t-shirts...making them fun for her to wear...knowing that I attacked them with much love so that she is covered with my love all day long.  Anyhow, I eventually bought some fabric stamp pads and first tried them on this bag-lette.

Well, today Ava helped me stamp on a -not so- white (and rather wrinkled) nursery t-shirt.  It is a messy job and has her little finger prints all over it.  But, she loves it and is sleeping in it tonight.

I did the orange butterflies and the most of the darker pink ones...the rest is all her doing.

We used Versa Craft stamps in Cherry Pink and Tangerine.  Yes, I know that my stamp lids are all wrong and that the blue lid is on the pink stamp.   The stamps were little butterfly rubbers.  Is that wrong?  Should I rather say "erasers"?

We slid a piece of paper inside the shirt, just in case the ink bled through.  It didn't.  And went wild stamping.  I tried to get Ava to coat the butterfly nicely in ink, but that didn't happen!  A nicely coated stamp gives a lovely bright and bold colour.  A less coated stamp gives a faded print.  Both are lovely and it gives some nice texture to the colours.

The controller in me could only take so much mucky printing, so we only stamped one side of the t-shirt.  Besides, it takes time for the ink to dry and 'we' were getting impatient to wear the shirt.

Once the ink is dry, you will need to iron the fabric to set the ink.  I would highly recommend using a piece of scrap fabric between your hot iron and your art work...to save your iron from turning orangey-pink, like mine did!  Saying that, the colours didn't seem to stick for long and wiped off easily on to my scrap fabric - once I had decided that was the better way to go...

One little person was very happy to put a warmly ironed t-shirt on.

My photo allowance expired after one photo, so this one is blurry...sorry.  'We' are pointing to our favourite butterfly.

See the parcel over Ava's shoulder?  That is a brown paper bag stamped with blue and green hearts and dots.  The colours are lovely and vibrant, just like on the t-shirt.

When this shirt has been washed I will update this post with a picture to show how well the ink washes.  I haven't washed this ink before, so am very interested to see how well it holds.

Not being able to leave anything alone, I might just get the laundry marker pen out and draw feelers on to some of the butterflies...


*************************************************
Edited:  Have a looky here for the update


Monday, 4 June 2012

Jubilee Sale!


If you fancy a bit of a Jubilee treat for your little people...you will find that everything in my Etsy shop is on sale!  The sale ends on Sunday 10 June.

If there is something that you like in my TLF shop and you would like to grab it at the same 20% discounted price, let me know and I will sort it out for you.

Happy shopping!